Daenerys tutorial
Daenerys' white fur coat form season 7 is one of my absolute favorite costumes of hers, so I finally managed to make write the tutorial.
I totally fell in love with it once I saw it. It took me a while to really start it, because I was honestly kinda afraid of it ^^ That feeling never really got away, but all the hard work and struggle paid off in the end. I'm really happy with my coat!
Here's a Tutorial on how I made Dany's fur coat.
Daenerys tutorial - Fabrics and Pattern
I used faux furs from this e-bay seller stoffe-abc
The faux leather stripe I also bought from e-bay, but unfortunately I can't find the seller anymore. But I used up like almost 3 rolls!

As I already made Dany's silver-black dress from season 7, I had a better idea on how to create the pattern. It was still a difficult progress getting it right tough....
If you're interested I also made a tutorial on Daenerys' silver-black dress.

Here's my front pattern. You can see I made a seam just under the breast in the side panel. This seams in the waist area. But in the end you won't be able to see these seams, in fact you won't be able to see any seams. 😉
And here is the back pattern.What's still missing at this point, is the back panel which will be made from the darker fur. We will come to that later...
Below you see some close up of the collar.


")
And last but not least, here's the sleeve 🙂
Daenerys tutorial - Mock up
As always: please do at least one mock up. Especially if it is a more complicated pattern.
The one in the picture is my second mock up btw.

All in all I was pretty happy with my 2. mock up and didn't have to change much more.
I did some fine tuning on the shoulders and took in a bit around the waist and hips. And I decided to make the coat somewhat longer in the back.


Daenerys tutorial - Fur tests
before I started the actual thing, I wanted to test out some techniques to get the desired effects...
For the fur stripes it helped me figuring out how wide the should be and also that I had the wrong color of leather stripe. I started with a more beige one and then went with a more gray one.
For the back panel I actually bought a fur trimmer for animals, but then figured out that I preferred a pair of sharp scissors. FAIL! 😛 But hey now I could give my cats a trimm if I wanted to (I'm sure they would like it a ton ^^)


Anyway I highly suggest you do your testing, even if it's just getting the hang of it.

Daenerys tutorial - First layer or base of the coat
On the left you can see the front of the top part, with the attached shoulder pieces that continue in the back. I used a cotton muslin fabric (the one I used for the mock up)
And here is the back part of the top with the side front pieces sewn to it. On the top of the back I added some faux suede. You can't really see it in the end, but if you would reach under the back shoulder flap you would feel the suede 😉


I added some sew on boning to the shoulder seam to give it a bit more hold.
Cutting the fur for the skirt part. I used small scissors to cut just the back of the fabric, not the hairs. Yep that took a while...


Back and side panel pinned together.
To make the seam less obvious, I combed it out. btw I used a rather large stitching length to allow the hairs to come out in the combing process.
On the right you can see the finished seam or better you can barely see it 😉


I also cut and combed away most of the hairs on the back of the seam to reduce volume.
Here I attach the fur skirt to the top with a zig zag stitch.

I forgot to take a picture on attaching the collar, so in this pix it's already sewn to the top.
Here's how the base of the coat looks like. The front is not sewn to the rest yet, that will come later.


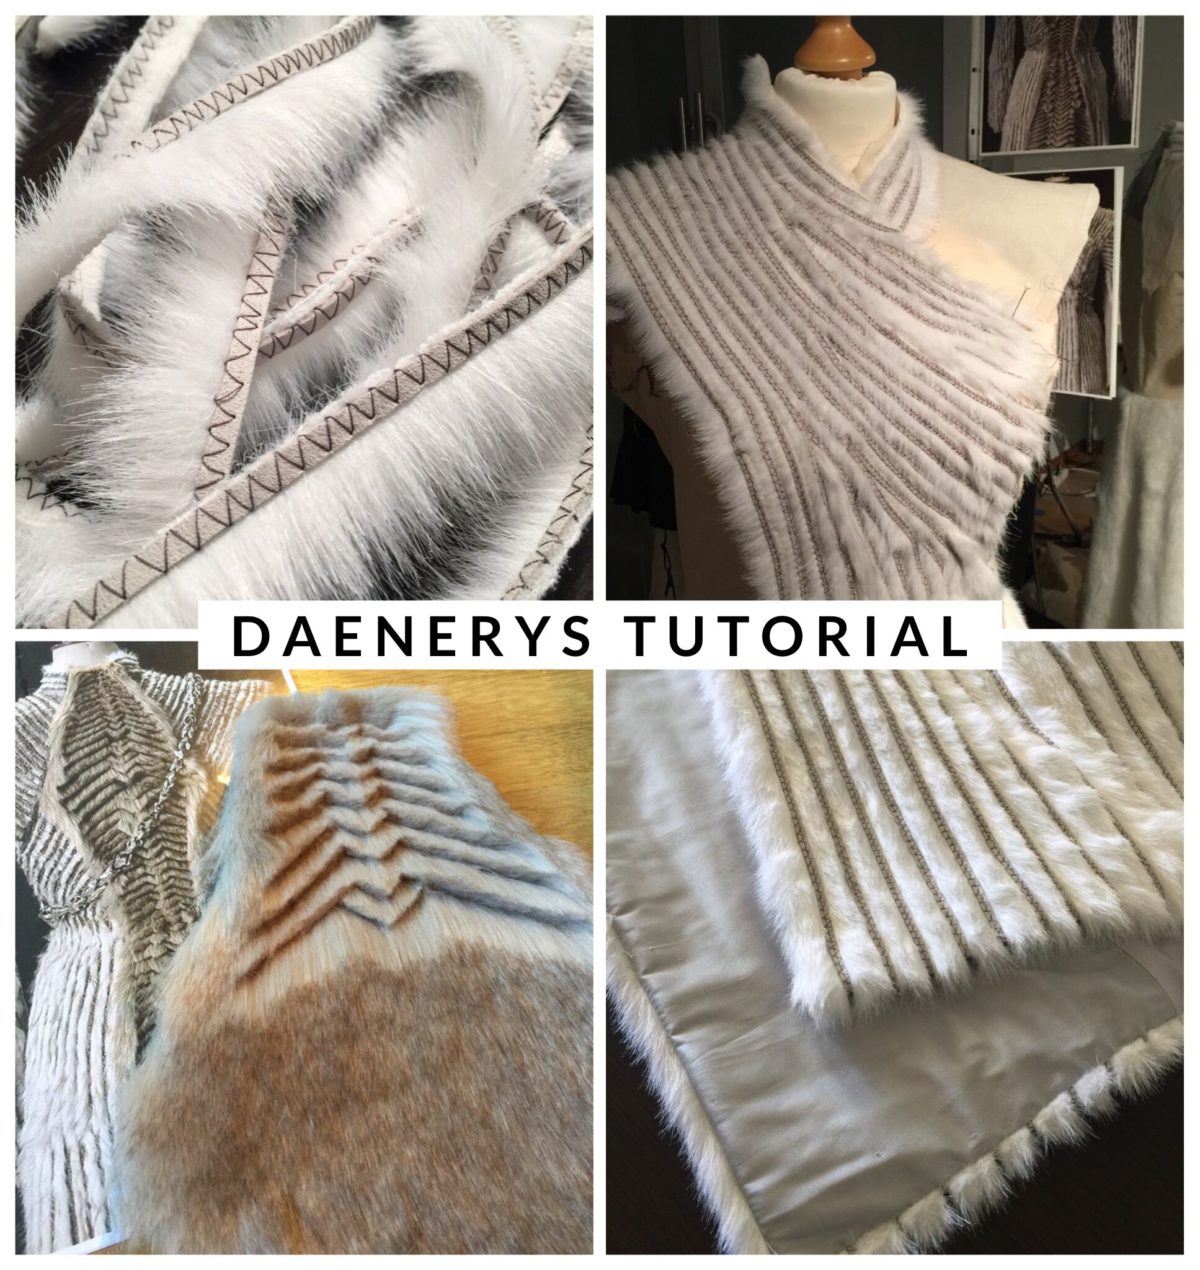
Daenerys tutorial - Fur stripes as far as the eye can see....
I'm not going to lie, this whole stripe process really takes forever! But in the end it will so be worth it. 🙂
On this picture you see the firs few stripes I cut. they are 1 cm (0.4 inches) wide. Be careful not to cut away the fur, only the back fabric.
Next step is to add the faux leather stripes to the fur stripes. I used a dark gray thread to zig zag it on.


Then it's time to bring the that stripes onto your actual fabric base. I started at the top and always pined them in place before I sewed them on with a straight stitch. Sometimes I pinned down a few rows just to see where this goes. I didn't prepare all the stripes in advance, just some and then made some more every so often. Cause you literally have no idea how many you will need 😉
I started on the side that is seen more in the end, so the one that is in front of the other. I just wanted to make this as exact as I could and the copy it to the other side in a faster way. But you could also start on the side that is more hidden to first kind of test it out. do it however you want.
I was constantly comparing my piece to the original on a picture I hung up. That really helped me.


Here you can see the pins on the two last rows. By the way, my stripes only go to the edge where there will be a seam later. If you go over the seam allowance, it will get much very thick once you sew the edges. Did the same in the front as well, as you can see in the pic above.
Once you reach a certain point, where your stripes will continue into the skirt part, you will have to change the technique a bit.
I first measured how much of the stripe will be in the top part and cut the fur strip to this length.

Then I cut the leather strip to approximately the bottom of the skirt or a better a bit longer. As before I would zig-zag it onto the fur, but then continue the zig-zag down the stripe to the end.


I then pinned the the stripe in place, so the fur part would end exactly at the edge of the skirt part. And then first only sew down the stripe half that till the seam and let the leather half dangle down the skirt. When I came to the end of the front piece and the striped where all fixed to the top, I arranged the leather strips on the skirt (did that while it was flat on the ground) to distribute them as even as I could, before sewing them down as well.
Below you see the finished first front piece.


Then I moved on the to side/back piece of the same side. Now before I started to sew on more stripe-combos I sewed a sewed a only-fur stripe to around the sleeve hole, then I started to arrange the stripes as I did before.
I strongly advice to pin down as many stripes as you can, before sewing them down. This way you can change it more easily if you don't like the way the pattern turns out. If you pin only one or very few at the time and the sew them down, you might have to open up everything again further down the road.
I would know, because I made that mistake. So don't us that picture below as a reference, cause I had to change it later... (I'll show a picture of the better version later)
On the second picture you can see the sewing on process close up.


As I said I had to open up quite a few of the stripes again, as the pattern in the back turned out getting shitty, or at least not the way I wanted it to look. You can see that a bit in the next picture.


Here's me, starting again 😉
Some more WIP pix...


And then I started on the second side (the left side) I did not take as may pictures on the second half. I basically copied the first half, but I did not pay that much attention on the front part, as it's mostly covered by the right front piece.

Here you can see how I did a better job getting the back right. With pinning down a lot of rows first 😉
Also check the mirror, because I kinda forgot to take pix of the back in this point of the process...


Btw at this point the two front pieces and the side/back pieces (which was already one piece) are still separate. Sewing them together came next and I'm very sorry but I did not take pix of the actual sewing of the front princess seams. But I first pinned them together and then used my sewing machine.


Daenerys tutorial - Shoulder wings
Okay next step is finishing up those shoulder pieces. Here I cut the backing. I used light gray faux suede.
But before I sewed on the lining. I added one last fur stripe to the edges for the furry finish 😉

Now here with the lining attached. Btw be very careful if you want to iron this costume! Because the fur tends to melt/burn. I tried it here and regretted it. I managed to destroy some of the hairs on the edges. Luckily it's not that bad, but still be careful!


Here I tried to figure out where I would have to attach the shoulder wings in the back.


As it's not really possible to iron the fur and the seams are quite thick, I just sewed them down to make them lay flat.
The inside of the shoulder wing. You can't really see this in the end, only if you are very close and look under the wing.


This is under the armpit, finishing off with another leather strip, before joining the shoulder.
Here I sew the back piece to the front piece by hand.


Daenerys tutorial - Sleeves
Next thing is the sleeves. Here you can see the faux suede part of the sleeve.
And here both pieces.


This is the pattern I made for the design on the sleeves.
I copied the design to the back of the fur and followed the lines with my sewing machine, using a large stitch.


Here I'm preparing the leather stripes with zig zag stitching.
And then sewing them onto the fur with a straight stitch, following the lines I sewed before.


Then I pulled out all the hairs that got stuck in the sewing process.
Here all the hairs are pulled and combed out and ready to be cut. The cutting gives the sharp and lines and edges. But I only cut the fur along the zig zag lines not the straight ones that go down the length of the sleeves.


Sewing the sleeves together (fur and suede parts)
I then sewed down the seam allowance per hand.

And that's it, the sleeves are done 🙂


Here the sleeves are just pinned in.


Daenerys tutorial - Dragon back
One of the best details of this costume is the back piece, that looks like a dragon spine. I love it! On this picture is just the faux fur still without any decorations.
Here is my pattern with the design, held next to a mirror to see how it will look 😉


Then I transferred the design onto the back of the fur. That took quite a while.....
So I'm able to see the pattern on the fur side. I sewed along the lines from the back. As the fur has such long hairs, I could only sew from top to bottom, not the other way around, because it would sew in the hairs in a weird way.


I would sew a few lines and the do the cutting. Then sewing again and so on...
Below you can see the sewed lines and then I would cut only the top layer of the fur to create a line, the I removed the threat, before continuing.


With the help of that line, I could then cut deeper into the fur, almost to the bottom. But I cut layer by layer, using scissors btw 😉
Then I just kept repeating the process and worked my way down.....


For the final touch, I used some acrylic paint (mix of brown and black) to deepen the creases.


Here is the finished back piece.
Well almost finished... to prevent the edged of the back piece from caving inwards, I added a stiff gauze fabric to give the whole thing mord hold.


I attached the gauze with large stitches by hand.
Then also by hand, I sewed the fur edges down.
Now everything is ready for the lining.


Daenerys tutorial - Lining and finishing
I used this silver dupion silk from
silknature.de/ for most of the lining. Only for the top part, that you can't see at all, I used a silver cotton fabric.
Before I attach the lining I'm reading the coat and it's edges for it. Here you can see the sleeve seams.


To make the seam allowance less bulky, I cut away the extra hairs. But see to it, that you leave enough at the edge.
Then I hand stitched the hems like I did on the sleeves.
Here I attached the lining fabric to the front (and also back edges) with my sewing machine.

More hand sewing to keep the edges down, as you can't iron it, or only very lightly.

Hand sewing the corners. I also cut away any extra fabric to make it as slim as possible.


Then I first attached the lining at the waist line (everything by hand) and the sewed it to the hems.


Last finishing touches for the collar. One more leather stripe to put in place 😉


And then also one more fur stripe from the collar down to the waist to make the edge look more "fluffy" (also by hand)


Forgot to mention, that I sewed in a plastic boning in the back center (of the top part). Here I attached the collar to the back panel.
And then also attached the shoulder wings to the back.


Then I sewed in the top part of my lining (mostly cotton, except the front).
I then sewed in the sleeves, but I have no pictures of the process. Let me just tell you it was hellish... XD with everything stiff and bulky and also pretty thick, it was a pain to sew them in (with my sewing machine). But I managed in the end 😉
Once the sleeves where in, I could hand sew the lining of the sleeves (as you can see in the second picture)


Here's the finished lined coat skirt. I think it looks so pretty 🙂

What wasn't yet lined, was the back panel. Here I only lined the bottom part, as top will be sewn to the coat anyway.


Of course I did this lining process also by hand 😉


And then I finally hand sewed the back panel to the coat XD That was also a pain. As you have to make sure it really holds and it's quite heavy and not very accessible.
The absolute finial step was to attach the closure hooks. I did use 4 hooks:
One at the collar, one at the top corner, one at waist level and one at hip level (you can't see that one in the picture, it's further down)

Finished coat
Well that's it for my Daenerys tutorial!!! Here are some pictures of my finished coat.


If you read that far, thank you for your patience! I hope you found my Daenerys tutorial helpful. Please feel free to share it, that helps me to create more content.
I also wrote a tutorial on how I made my dragon chain and brooch. If you're interested, you find it here
If you have any question, leave me a comment.


Wow! Amazing job, thank you for sharing all the details
I’m glade you find them helpful 🙂
How did you make the pattern? I would like to make one myself but I don’t know how to cut out the pattern pieces to fit my body, how would I go about doing the dimensions?
Dear Rebecca, unfortunately this is not a question I can answer quickly.I learned pattern drawing at a school during 3 years and since then I have deepened my knowledge over many years. I recommend you to take an existing pattern, which is approximately similar and then adapt it. Then be sure to do a fitting in an inexpensive fabric to see how the pattern fits. If it doesn’t fit, repeat this step until the sample coat fits you. I wish you a lot of success and fun. 🙂
Sarah
I was wondering how many yards of did you use? I have found the pattern and want to create a coat exactly like this and I am trying to find out how to do it the cheapest way possible but still make it look good.
Sorry I meant how many yards of fur
I think I used about 3 meters of white fur, that’s a bit more then 3 yards. 🙂
Do you sell this coat?
I’m sorry but I’m not going to sell my coat 🙂
Wow!!!!!
Your work is SO impressive and absolutely gorgeous! Kudos to you for figuring all this out and sharing it! Just WOW!
Dear Susan, thank you so much 🙂 I’m happy you like my work!
Exquisite
Bonsoir,
Je faisais des recherches pour trouver un patron du manteau que vous avez réaliser qui est magnifique, j’adore, pour l’association dont je fais partie.
Nous avons fabriquer le trônes pour le marché de Noël afin que les visiteurs puissent faire des photos, et pour cette année on m’a demander de réaliser le manteau.
J’aurais aimer savoir si vous seriez d’accord de partager votre patron ?
Merci d’avance pour votre réponse.
Christine